Introduction
Achieving a clean, professional vocal sound doesn’t require expensive plugins! Logic Pro comes equipped with powerful tools that, when used right, can elevate your vocal tracks to studio quality. In this guide, we’ll cover three essential steps to remove muddiness, control sibilance, and smooth out dynamics in your vocal recordings. Plus, if you’re looking to take it even further, we’ve included some bonus techniques for added depth and warmth.
Step 1: EQ – Remove Mud and Boxiness

The first step in cleaning up vocals is to apply reductive EQ to remove any unwanted frequencies that can muddy up the mix. Here’s how to do it:
- High-Pass Filter: Start by setting a high-pass filter around 80-100Hz to cut out low-end rumble. Be careful not to remove too much, as it could make the vocal sound thin.
- Target Muddy Frequencies: Look for boxy or muddy frequencies around 200-500Hz and apply a gentle cut. This clears up space and removes that ‘boxy’ sound, allowing the vocal to sit more clearly in the mix.
Pro Tip: Listen for areas that sound congested or dull and apply a subtle dip to enhance clarity without losing fullness.
Step 2: De-esser – Control Sibilance

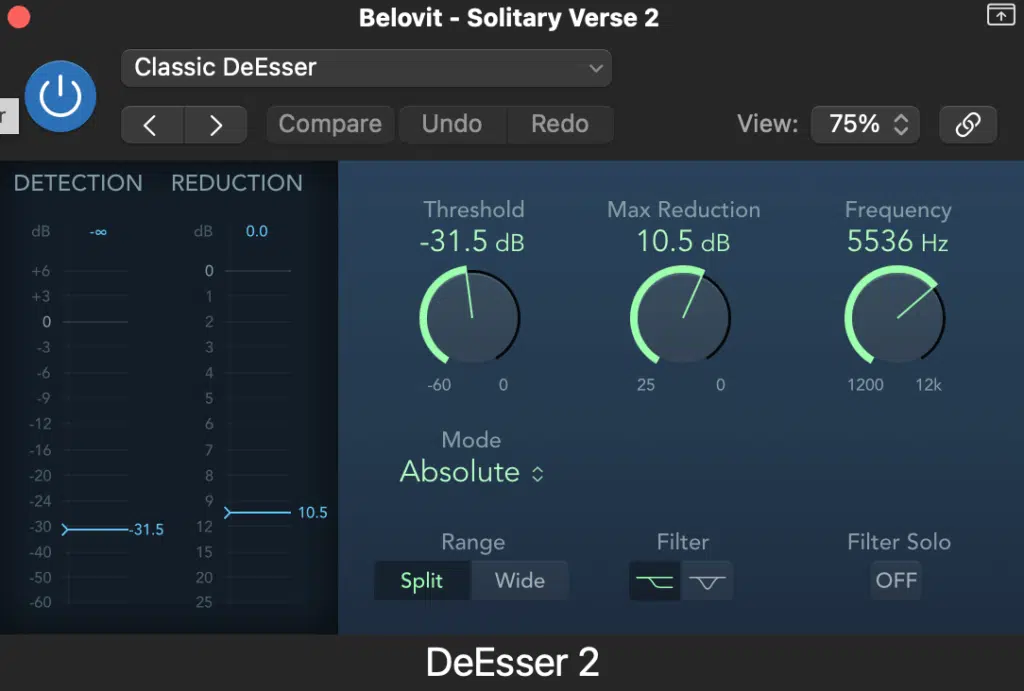
Next, tackle any harsh “S” or “T” sounds with Logic Pro’s built-in De-esser plugin. Here’s how to use it effectively:
- Set the Target Frequency: Sibilance is usually found between 4kHz and 8kHz. Start here and adjust based on your vocal’s unique tone.
- Threshold Adjustment: Lower the threshold until the harshness of “S” sounds is controlled but without dulling the vocal. Aim for a natural, balanced sound.
Pro Tip: Test the de-esser on both quiet and loud parts to make sure it’s effective without being too aggressive.
Step 3: Compression – Smooth Out Dynamics

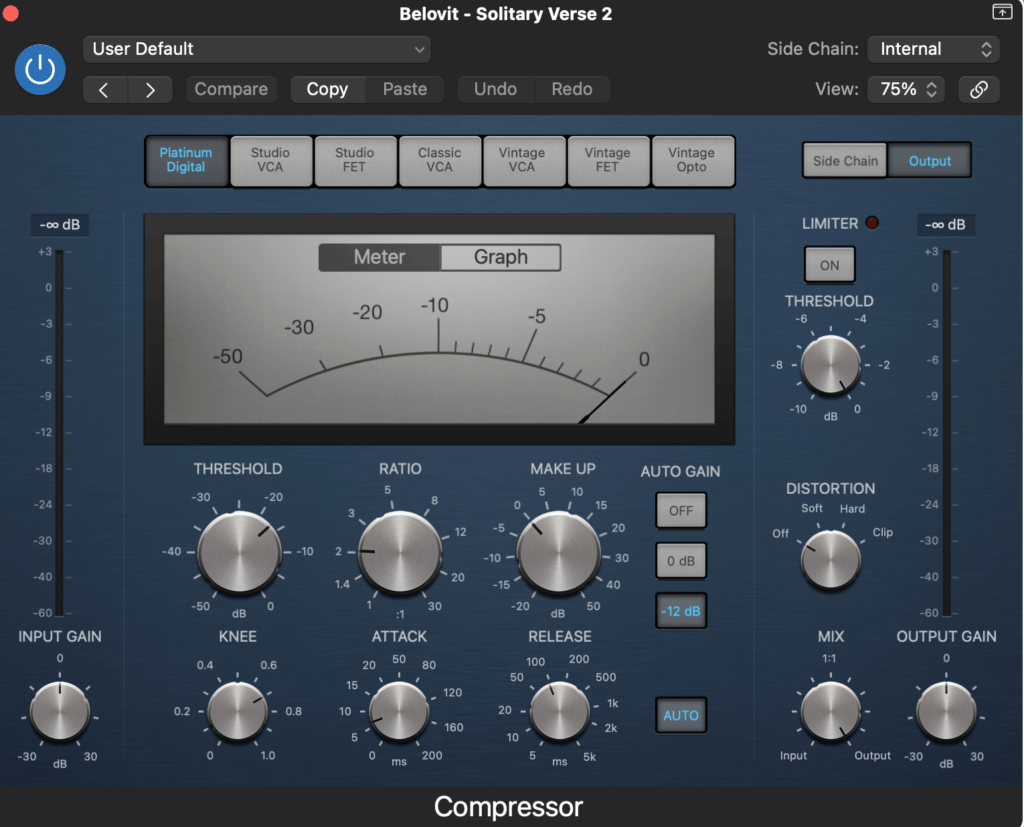
Now, let’s smooth out the vocal’s dynamics with some compression:
- Ratio and Threshold: Start with a moderate ratio (e.g., 2:1 or 3:1) and adjust the threshold until the compressor reduces the peaks by about 3-6dB.
- Attack and Release: Use a medium-fast attack to keep the vocal lively and a medium release to create a natural, even sound. Adjust until the vocal sounds controlled but not squashed.
Pro Tip: Compression should add consistency and control without making the vocal sound flat or lifeless.
Bonus Section: Taking Your Vocal to the Next Level
Once you’ve covered the essentials, here are some bonus techniques to add depth, presence, and warmth to your vocal!
Step 4: Parallel Compression – Add Depth
Parallel compression is an excellent way to add body and fullness without losing the vocal’s dynamics.
- Set Up Parallel Compression: Duplicate your vocal track and apply more aggressive compression to the copy (using a high ratio and lower threshold).
- Blend to Taste: Slowly mix the parallel-compressed track with the original until you achieve a thicker sound that still retains the vocal’s natural dynamics.
Pro Tip: Parallel compression works great on lead vocals to make them stand out without overpowering the mix.
Step 5: Additive EQ – Enhance Presence and Clarity
With the vocal cleaned up, you can now use additive EQ to bring out the best characteristics in the track.
- Enhance Air and Clarity: Gently boost around 8-12kHz for brightness and presence. Add around 1-3kHz for added clarity.
- Be Subtle: Small boosts go a long way, so don’t overdo it. Add just enough to make the vocal shine.
Pro Tip: Always A/B your EQ adjustments to ensure you’re enhancing, not overpowering.
Step 6: Saturation – Add Warmth and Analog Character
Finally, add a touch of saturation to give the vocal a warm, analog feel.
- Use Logic Pro’s Pedalboard or Overdrive Plugins: Start with a low drive setting to add subtle harmonic richness. You don’t want obvious distortion—just enough warmth to make the vocal feel alive.
- Blend Carefully: Use a mix knob if available, or create a duplicate track and blend the saturated signal with the original vocal for added control.
Pro Tip: Saturation can enhance the vocal’s character, making it sound fuller and more dynamic without changing the core tone.
Conclusion
By following these simple steps, you can achieve a clean and polished vocal sound using only Logic Pro’s stock plugins! Start with reductive EQ, add a de-esser, and finish with compression to lay a solid foundation. For extra enhancement, try parallel compression, additive EQ, and a touch of saturation. These techniques are effective, accessible, and easy to implement for any Logic Pro user looking to step up their vocal mixing game.
Ready to take your mixes further? Practice these steps in your next project and experience the difference in clarity and warmth. And remember, great vocals start with a clean foundation, so focus on the essentials first and use the bonuses to add that final polish.
![]()


